Competition Pro to Xbox
Last week some good friends came over and we fired up Vice64 and played the old, classic Games from our childhood. Funny that you still know some of the moves in California Games although I haven’t played it for over 15 years. It was lot of fun. We hooked up the Acer ONE to my fat LCD tv and used two of those USB Competion Pros from Speedlink. Pure pleassure… they did a good job in resurrecting this classic.
Only having OS X on my ONE and the external Videoport is not working – hackintoshs have their flaws, you know – I was thinking about my good old xbox with Gamebase64 installed. No windows to wait for, no freaking ugly interface like Gamebase has on PC, not much hassle with configuration and twiddeling with the USB ports… sounds like a lot of reasons to get a Competition hooked to it. Asking google revealed that many people have already hacked their contorller and put a D-SUB9 in place. On xbox-scene bek postet a little tutorial. Sadly the pictures were far from usable and in his text he is mixing up left and right when talking about the D-SUB port and the solderpoint for the firebutton is TP76 instead TP78 which I couldn’t find at all on the both controllers I hacked.
Anyway, his tutorial is great for a electrical noob like me. I zoomed aroud in photoshop till I found the point he used for the firebutton… with a little luck, off course. So here is my little help fix for you, If you would like to play old games like they where meant to. This is for the original xbox crontroller, the big version.First off all the pinout for Atari/Amiga/C64 compatible ports, seen from the soldering side.
1 Forward – 2 Back – 3 Left – 4 Right 5 – not connected – 6 Button 1 – 7 +5V * – 8 GND – 9 – not connected
________________
o5 o4 o3 o2 o1/
 o9 o8 o7 o6 /
 ___________/
Unscrew the controller – 7 Screws on the outside, additional 6 on the inside, on the board. Here’s a picture that should be self-explanatory. Behind the “>” you can read the pin of the D-SUB plug.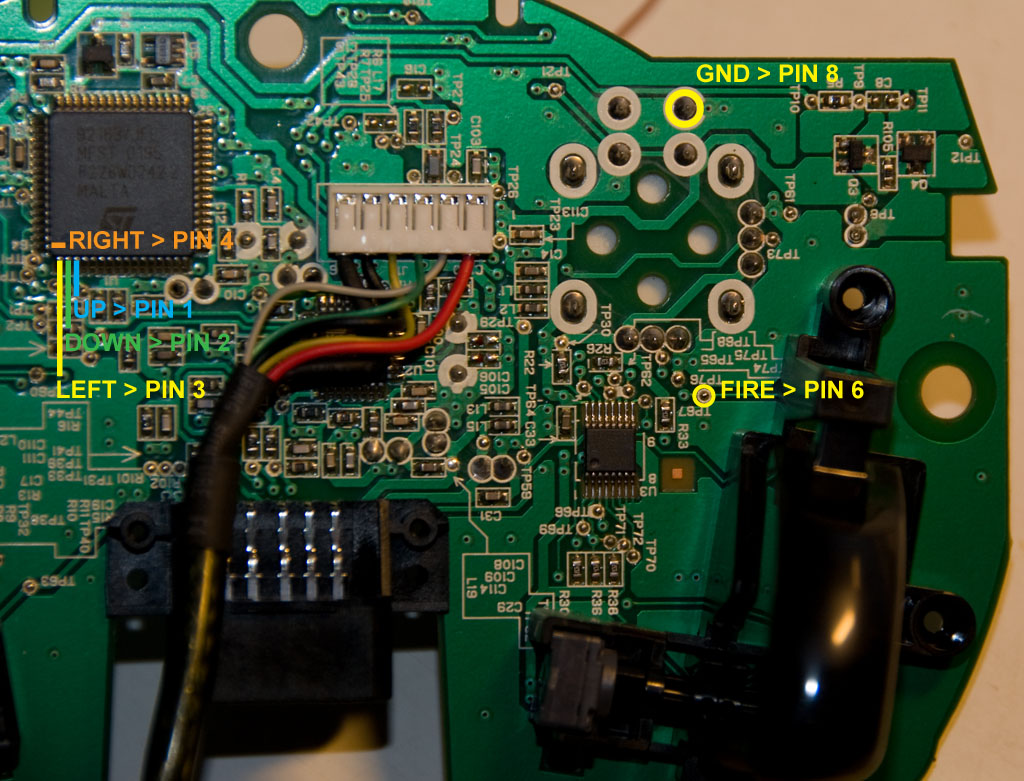 When soldering be careful not to stay long on the latches of the controller chip or too long – I just killed my second controllers d-pad with too much heat.
Off course I will not take any resposability for any damage to you, your console, or controller. Try this at your own risk! If you are not familiar with soldering tiny spots, hence SMD, you better look for someone to do it for you. Like I should have done with the second attempt.
So, I will take my chances – which are by far now better than with the d-pad – and kick some reds ass on International Karate.Have fun!
EDIT: I recently got myself into the arcade stuff again and while browsing for some infos I found this neat tutorial, with all solderpoints listed…. far better than mine while easier to solder to. Thanks to Xerxes3rd for this one.
http://www.xerxes3rd.net/staticpages/index.php?page=GenesisControllerOnXbox